在vue项目中,搜索功能是我们经常需要使用的一个场景,最常用的是在列表数据中搜索一个想要的,今天的例子就是我们实现VUE从列表数据中搜索,并展示。
功能流程
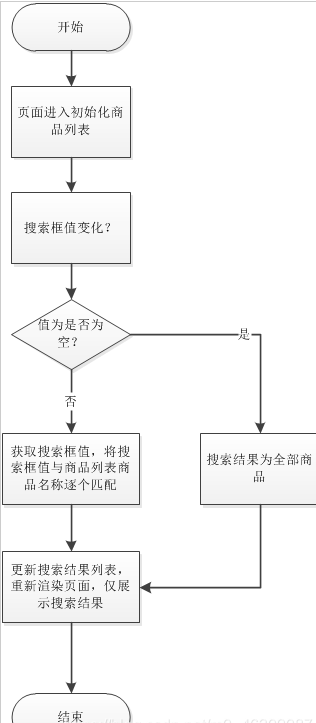
这里我们进行简单搜索功能,搜索逻辑是只要用户输入值与产品的名称进行模糊匹配,符合条件的数据进行展示,不符合条件的数据过滤。流程描述如下:
功能实现
Vue组件化
实现如上图功能,我们肯定是使用vue的组件特性,将搜索以及,产品列表抽成组件,以提高代码复用性,抽成组件之后,该页面将由三个部分组成,数据在以下三个组件之间传递:
父组件:主页面,用于数据逻辑处理;
搜索组件:给父组件传递用户输入值;
列表:展示从父组件接收的值。
代码
父组件:index.vue
<template>
  <div>
    <title-bar :title="title" @goBack="goback"></title-bar>
    <search-input
      :plhtext="searchPlhText"
      @input-changed="searchInputChange"
    ></search-input>
    <div v-for="(PRd,index) in productlistRst" :key="index">
      <prd-item :prd="prd" @toPrdDetAIl="toPrdDetail"></prd-item>
    </div>
  </div>
</template>
<script>
import TitleBar from "@/components/TitleBar";
import SearchInput from "./components/SearchInput";
import PrdItem from './components/PrdItem';
Export default {
  name: "",
  components: {
    TitleBar,
    SearchInput,
    PrdItem
  },
  data() {
    return {
      title: "产品列表",
      searchPlhText: "请输入产品名称",
      productList: {}, // 产品列表
      productListRst: {}, // 搜索筛选之后的产品列表
    }
  },
  created() {
    // 初始化页面参数,按照生命周期,子组件需要的参数父组件需要在created生命周期取值
    this.initParams();
  },
  methods: {
    // 返回方法
    goback() {
      // this.$Emit("GoBack");
    },
    // 初始化页面参数,获取产品列表
    initParams() {
      this.productList = [
        {
          imgPath: 'apple-1001.png',
          name: 'Apple iPad Air 平板电脑(2020新款)',
          price: '4799.00',
          sale: '5',
          ranking: '10000+评价 平板热卖第5名',
          prdShopName: 'APPle官方旗舰店'
        },
        {
          imgPath: 'apple-1002.png',
          name: 'Apple iPhone 11手机',
          price: '4999.00',
          sale: '5',
          ranking: '375万+评价',
          prdShopName: 'Apple官方旗舰店'
        },
        {
          imgPath: 'apple-1003.jpg',
          name: 'Apple AirPods 配充电盒 Apple蓝牙耳机',
          price: '1246.00',
          sale: '5',
          ranking: '200万+评价',
          prdShopName: 'Apple官方旗舰店'
        },
      ];
      this.productListRst = this.productList;
    },
    // 每次search框变化则进行筛选,对数据进行逻辑处理
    searchInputChange(value) {
      // 若未输入值,则展示所有数据
      if(null === value || undefined === value){
        this.productListRst = this.productList;
      } else {
        this.productListRst = []; // 结果列表置空
        let regStr =  '';
        // 初始化正则表达式
        for(let i=0; i<value.length; i++){
          regStr = regStr + '(' + value[i] + ')([\\s]*)'; //跨字匹配
        }
        let reg = new RegExp(regStr);
        console.log(reg);
        for(let i=0; i<this.productList.length; i++){
          let name = this.productList[i].name; //按照名字匹配
          let regMatch = name.match(reg);
          if(Null !== regMatch) {// 将匹配的数据放入结果列表中
             this.productListRst.push(this.productList[i]);
          }
        }
      }
    },
    // 去往产品详情页
    toPrdDetail(){
      this.$Router.push({path: 'detail'})
    }
  }
};
</script>
<style scoped>
#page-title {
  width: 100%;
  background-color: #fff;
  display: flex;
  justify-content: center;
}
.backImg {
  width: 20px;
}
</style>
主要的逻辑处理是 searchInputChange,对于更复杂的搜索逻辑,也可以在里面进行处理。
搜索组件:searchInput.vue
<template>
  <div class="search-box">
    <div class="search-input">
      <img src="@/assets/images/search.png" />
      <input
        type="text"
        :placeholder="plhText"
        maxlength="10"
        @change="inputChange"
        v-model="inputValue"
      />
    </div>
  </div>
</template>
<script>
export default {
  name: "searchInput", // 搜索输入框
  props: {
    // input框占位文字
    plhText: {
      type: string,
      default: "请输入搜索内容"
    }
  },
  data() {
    return {
      inputValue: "" //输入框的值
    };
  },
  methods: {
    // 每次输入框变化刷新列表
    inputChange() {
      // 使用emit给父组件传值
      this.$emit('input-changed', this.inputValue);
    }
  }
};
</script>
列表组件:productList.vue
<template>
  <div class="prd-item" @click="toPrdDetail">
    <img :src="reqUIre('@/assets/images/'+prd.imgPath)">
    <div class="prd-discription">
      <div class="prd-title">{{ prd.name }}</div>
      <div class="prd-sellInfo">
        <div class="prd-price">{{ prd.price }}</div>
        <div class="prd-saleLable" v-if="prd.sale.lenght!==0">
          <label>12期免息</label>
          <span>新品</span>
        </div>
        <div class="prd-ranking">{{ prd.ranking }}</div>
        <div class="prd-shop">{{ prd.prdShopName }}</div>
      </div>
    </div>
  </div>
</template>
<script>
export default {
  props: {
    // 传入产品对象,必传属性为imgPath,name,price,shop
    prd: {
      type: Object,
    }
  },
  methods: {
    // 跳转产品详情页面
    toPrdDetail() {
      this.$emit("to-prd-detail",this.prd.Id);
    }
  }
};
</script>
标题头组件:titleBar
<template>
  <div>
    <div @click="goBack">
      <img src="@/assets/images/arrow_left.png" />
    </div>
    <div>
      <label>{{ title }}</label>
    </div>
    <div v-if="showRightArea">
      <img :src="rightImgPath" />
    </div>
  </div>
</template>
<script>
export default {
  name: "titleBar",
  props: {
    // 标题
    title: {
      type: String, //规定数据类型
      default: "标题" //默认值
    },
    showRightArea: {
      type: Boolean,
      default: false
    },
    rightImgPath: {
      type: String
    }
  },
  methods: {
    // 返回方法
    goBack() {
      this.$emit("go-back");
    }
  }
};
</script>
<style scoped>
.page-title {
  width: 100%;
  background-color: #fff;
  display: flex;
  padding: 10px 0;
  justify-content: flex-start;
}
.backImg {
  width: 15%;
  text-align: center;
  img {
    margin: 0 auto;
    width: 24px;
  }
}
.titleText {
  font-size: 18px;
  height: 26px;
  width: 70%;
  text-align: center;
  label {
    margin: 0 auto;
  }
}
.rightImg {
  width: 15%;
  text-align: center;
  img {
    margin: 0 auto;
    width: 24px;
  }
}
</style>
大家试试吧。


网友评论文明上网理性发言 已有0人参与
发表评论: